Bon Appetit... and Have Fun Storming the Castle!

Monday, February 21, 2011

Spicy Honey Glazed Tilapia


This was simple and quick enough to make as a weekday meal.  

First, I brined the fish for a little over an hour in a solution of 2qt water, 1/4 cup kosher salt, 1/2 cup white sugar
P1010918.JPG\

Rinsed and patted dry, rubbed some olive oil on the bottoms and then spread the tops only with honey, black pepper, cayenne pepper, and a little sea salt
P1010919.JPG


On to a little tray and into the smoker for 1 hour @ 225º
P1010920.JPG

One hour later, the fish flakes with a fork, so it's done.
P1010921.JPG

Made a little spicy honey (2 Tbs honey, 1/8 tsp cayenne) and drizzled it over the top as soon as they came off the smoker.
Served with a creamy parmesean risotto (box mix - not home made), and buttered peas.
P1010922.JPG

P1010923.JPG
Dinner is served!


Just some quick notes:  


I made four pieces, the other two went into a smoked fish spread (cream cheese (garden vegetable, plus some roasted garlic cream cheese), mayo, celery, onion powder, old bay, red pepper flakes, and  lemon juice).  The spread was OUTSTANDING!  I would make this again just to make some more spread.  This was as good as any smoked fish spread that I have ever tried!!!

Tilapia absorbs a lot of smoke quickly.  I used one small chunk each of hickory and mesquite.  To me, it was almost too smoky.  Next time, I will use apple and/or cherry and reduce the amount of wood.  


Bon Appetit, and Have Fun Storming the Castle!


Friday, February 18, 2011

Catapults, Part I

When Rachel first asked me to help her build a catapult for her History Fair , I could feel the two sides of my brain lining up to start battle with one another, swords raised, and in full attack mode.


The left part of my brain was saying, "Hmmm, a catapult...  Can we even do that?  The school has a zero-tolerance weapons policy.  But as long as she has the OK from her teacher, then that could pose some very interesting math and physics problems for her to overcome, and would require quite a sturdy structure. 


 What should we use for materials, and just as importantly, what types of joinery should be utilized to reduce the risks of failure from high impact lateral forces?"


The right part of my brain said "A catapult!  Hell yeah!"


So here's the deal I made with her.


1) She does all design work, calculations, and as much of the actual building and construction as I deem safe for her to handle.


2) We do not use real rocks or boulders as projectiles.  We will carve and paint styrofoam blocks to LOOK like boulders, but anything that can cause harm to people or property may NEVER be launched.


3) We will design a series of fail-safes and locking mechanisms that will prevent anyone from using the catapult when it is not under the watchful eye of her or one of her teachers.


4) I get to put goofy bumper stickers and slogans on the back of the thing when it's done (more on this later)


She accepted my deal, and immediately went on the internet to research designs and the physics of the catapult.


The style that she chose is known as the Mangonel


Mangonels fired heavy projectiles from a bowl-shaped bucket at the end of its arm. The Mangonel was used for aiming various missiles at castles, fortresses and cities. This type of catapult was easy to construct and wheels were added to the design to ensure manoeuvrability. The Mangonels were capable of firing projectiles up to 1,300 feet.

One of the interesting things about Mangonels is that they didn't just launch rocks.  According to several of the websites Rachel researched, The Mangonel could launch missiles across long distances. Attackers were ingenious in their ideas for launching projectiles which would cause distress and discomfort inside the castle walls. Mangonel missiles included the following:

  • Stones
  • Sharp wooden poles and darts
  • Fire
  • Casks of Burning Tar
  • Burning Sand ( this became trapped inside armor )
  • Pots of Greek Fire
  • Dung
  • Disease ridden bodies
  • Body parts
  • Dead animals
  • Any rotting matter
  • Quicklime
  • Dead, sometime mutilated, bodies (often peasants from outside the castle perimeter) 
That last one kind of gives new meaning to the phrase "Serf's Up!"


--------


Anyway, back to the construct:


Once she picked a plan and drew it to scale, we had to figure out a launching mechanism.  Since the catapults of that time used sinew to create the torsion needed to spring the arm forward, and a few thousand feet of the stuff was hard to find (and out of our budget), we opted for rubber surgical tubing.  Highly stretchable, cheap, and easily obtainable through Amazon.com


The rest of the supplies - mostly wood - was either already in the garage, or was picked up for just a few dollars at the local home improvement store.
(as a side note, it seems kind of ironic that one would go to the "home improvement" store for the materials to build a weapon designed to destroy a home).


With plans in place, we set out to build.  Started by measuring and cutting the 2*6 lumber we were using for the chassis, followed by the wheels and winding guides.


We decided to use pocket-hole joinery for the chassis.  Yeah, I know that's not very historically accurate, but we needed something that 
1) she could do easily and accurately
2) provided a strong joint
3) we could easily disassemble/reassemble as needed until the unit was done, and then add glue for the final build. 


Using the KREG pocket hole system, Rachel assembled the entire chassis (and learned a new skill!)


The wheels and guides were made from a sheet of 5/8" OSB, that was cut into six 16" x 48" strips.  Those strips were stacked 3 high and glued together into 2 pieces, which were then cut into six 16" x 16" x 1.875" squares.
The squares were then cut using a circle-cutting jig on the bandsaw into four 15" diameter wheels, and two 10" diameter winding guides.


Here's Rachel at the band saw cutting the wheels with the circle-cutting jig.


Finished wheels, stacked and ready for drilling the holes for the axles.


Rachel used a 1" spade bit to cut the axle holes in each of the wheels.  We used the dimple left by the circle-cutting jig to ensure that each of our holes were dead-center.


That's all we were able to accomplish on day one and two.  We moved the parts into the shed for now, and will get back to it next weekend.

Bon Appetit, and Have Fun Storming the Castle!

-Steven

Tuesday, February 15, 2011

For my wife on Valentines Day

For my wife, who prefers chocolate-covered bacon to chocolate-covered strawberries, thank you for spending the time with me so that we could make both, together. You feed my soul.

For my wife, who knows the starting lineup for both the Bucs *AND* the Rays, and who watches SportsCenter even when I am not home, thank you for justifying our tailgating equipment by calling them "hurricane supplies." I am your biggest fan.

For my wife, who used her work merit rewards to buy a charcoal smoker instead of a gold necklace, thank you for the sharing my passions. You keep the embers inside me burning.

For my wife, who shares my dreams for the future, thank you for being a part of it.

I love you as much today as the day I married you.

-Steven


Friday, February 11, 2011

Fort Wayne officials refuse to slap Harry Baals on public building


Killjoys scratch handle off erection


Officials in Fort Wayne Indianna have balked at naming the city's latest civic building after its most successful mayor – Harry Baals.

The city had thrown open the choice of moniker for its latest erection to the people. A campaign to name the building after Harry Baals soon gathered steam, with citizens eager to commemorate his four terms in office between the 1930s and 1950s.
However, the current administration has drawn the line at having Harry Baals splattered all over the new edifice, the AP reports.

While Harry's descendants pronounce the family name "bales", apparently the original pronunciation was more like "balls" – and killjoy city fathers are worried this might expose the City to puerile jokery.

"We realise that while Harry Baals was a respected mayor, not everyone outside of Fort Wayne will know that," deputy mayor Beth Malloy told the AP. "We wanted to pick something that would reflect our pride in our community beyond the boundaries of Fort Wayne."

One of Harry's descendents, Jim Baals, said: "I understand people are going to poke fun at it. That's OK. I've lived with that name for 51 years now, and I've gotten through it. I think everybody else can, too."

Fort Wayne is located in Allen County Indiana, but is not too far from Cass County, Clark County, Clay County, or Clinton County ... and even Hancock County. Sadly it is nowhere near Kerr County, Texas or Coffee County, Alabama


Fort Wayne officials refuse to slap Harry Baals on public building • The Register

Thursday, February 10, 2011

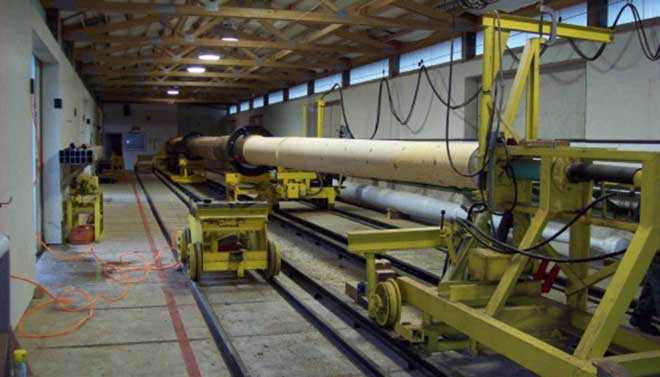
Giant Lathe Turns 120′ Tree Into Mast for tall sailing ship

Lathe Turns 120′ Tree Into ZODIAC Mast

Gray's Harbor lathe can turn up to 122' long

Another interesting post by Marty McOmber on Three Sheets Northwest. Interesting how this tool was built.

Down at the Grays Harbor Historical Seaport, home of the Lady Washington and Hawaiian Chieftain tall ships, they know a thing or two about wooden masts, booms and yards.

But what a lot of people probably don’t know is that the organization’s spar shop happens to have what is believed to be the country’s largest lathe — a tool many of us last played with in high school shop class to make a table leg or candlestick.

Let me tell you, this ain’t your high school’s lathe.

Technically a “tracer lather,” it can spin and shape a log 40 inches in diameter and 122 feet long. It’s so big, the seaport had to construct a custom building to house it.

So when the historic Bellingham-based schooner Zodiac lost her main mast and boom last September, it only made sense that her crew look to the Seaport’s spar shop to fashion new ones for them. After all, it’s not something you could pick up at Fisheries Supply.

continue reading >> Lathe Turns 120′ Tree Into ZODIAC Mast


Lathe Turns 120′ Tree Into ZODIAC Mast | Port Townsend Sailing Association

Tuesday, February 8, 2011

Turning Around America

One of the most interesting and ambitious projects mentioned at the Florida Woodturning Symposium was that of Beth Ireland, called Turning around america.

Beth is a production turner - a professional who produces hand-made turned pieces for architectural restorations, new (high-end) installations, and custom furniture makers.


Beth is spending eight months travelling across the country in a custom van, loaded with woodworking equipment and some basic necessities, and is stopping in towns all over the US to promote the act of "making objects with your own hands," by teaching woodworking and woodturning to as many people as she can.  She has been stopping at middle and high schools, vocational schools, art centers, and the like.  


Beth - and many of the woodworkers and woodturners like her - are concerned that since very few schools offer "shop class" any more, the number of people able to carry on the craft of fine woodworking and woodturning is dwindling rapidly.


Beth is a great presenter and has some outstanding woodworking skills. She is also a great teacher, motivator, and has a great sense of humor. I will be following her journeys at www.turningaroundamerica.com.


Monday, February 7, 2011

A Weekend of Woodturning - Part II

What could be better on a drizzly weekend than to work behind a brand-new high-end lathe, and teach scores of other woodturners new techniques and methods they may have never seen before?  


How about also watching other demonstrations and learning from some of the best names in woodturning in the same weekend!


It was my honor and pleasure to be one of the demonstrators at the 2011 Florida Woodturning Symposium this past weekend.  With attendance well over 300, the show was a resounding success, and the amount of information and ideas shared would take a lifetime to master.


New friendships were made, and old friendships rekindled.  Familiar faces brought recognition and  smiles and new faces were put with names only known previously as email addresses.  


I gave three classes during "Rotations" on Friday and Saturday, and the rest of the weekend was mine to enjoy, and learn.
My first and third demonstrations were on the same subject, with a completely different topic covered in the second rotation.


Being scheduled in the very first set rotations of the day has it's advantages and disadvantages.  You get an alert, attentive, awake(!) group of students, but you also get an alert, attentive, awake(!) group of students.  That means you have to be at your very best right form the very start.  I was much more "comfortable" in my later sessions, once the ice and tensions were broken.  


Note to self:  Start off your demonstrations with some sort of ice-breaker to relax the students and yourself!


First and Third Demo was on my Stacked Ring (Bowl from Board) technique.  Had over 60 people attend for demo #1 and demo #3, and about 50 for demo #2 with the middle session on "jigs, fixtures, and handy tips."


Here as just a few pictures, taken by my lovely wife, Brenda.


Got some pretty positive feedback, including a number of invites to clubs around Florida for demos and workshops, so all in all it was a pretty successful weekend.


More soon.....

Wednesday, February 2, 2011

Double-Duty Root Beer Brisket

Brenda sent me this recipe today. Sounds pretty interesting. I will definitely try it next time brisket goes on sale, which should be a few weeks with St. Patty's day coming up soon.


Double-​duty root beer brisket

Your slow cooker makes this root beer-spiced meal deliciously tender and easy to prepare. Bonus! You’ll have enough leftover meat for delicious sandwiches.
Why make one dinner at a time when you can make two just as easily? A large cut of lean brisket makes enough meat for a hearty hot meal one night, plus a quick supper of sandwiches later in the week. And this brisket has a special rich flavor thanks to a surprising ingredient: root beer.

  • Total Time : 5 hours 25 minutes to 8 hours 25 minutes
  • Prep Time : 10 minutes
  • Cook Time : 5 hours 15 minutes to 8 hours 15 minutes
  • Servings : 1 brisket can serve 6 to 8 when divided between an entrée dinner and sandwiches.

ingredients

    For Brisket and Vegetable Dinner
  • 2 Idaho potatoes, scrubbed well, halved and then cut into 1/2-inch slices
  • 4 celery stalks, cut into 1-inch pieces
  • 4 peeled carrots, cut into 1-inch pieces
  • Salt and pepper to taste
  • 2 Tablespoons olive oil
  • One 5– to 6–pound brisket, first cut or flat cut
  • 2 teaspoons ground allspice
  • 2 teaspoons garlic powder
  • One 12-ounce can regular or diet root beer
  • One 14.5-ounce can diced tomatoes, drained, liquid discarded
  • 1/4 cup Dijon mustard
  • 1/4 cup tomato paste
  • 1/2 cup flour
  • 3 scallions, chopped

    For Brisket Sandwiches:
  • 4 brioche rolls or sandwich buns
  • 1/3 of the cooked brisket, sliced
  • Reserved brisket sauce
  • 1 1/2 cups store-prepared cole slaw
directions

step 1Layer the potatoes, celery and carrots in the bottom of the slow cooker. Sprinkle with a bit of salt and pepper. In a large nonstick sauté pan heat the oil. Sprinkle the brisket with 1 teaspoon allspice, 1 teaspoon garlic powder, and salt and pepper. Place the brisket in the sauté pan and brown it well on both sides, about 3 to 4 minutes per side.
step 2While the brisket is browning, whisk together the root beer, diced tomatoes, mustard, tomato paste, flour, remaining 1 teaspoon each of allspice and garlic powder, and a pinch each of salt and pepper.
step 3Using kitchen tongs, remove the brisket from the skillet and place it on the potato mixture in the slow cooker. Add the root beer mixture to the sauté pan and bring to a boil over medium-high heat; use wooden spoon to scrape up any brown bits in the pan. Pour the liquid over the brisket and vegetables in the slow cooker. Cover and cook for 8 hours on low, or 5 to 8 hours on high.
step 4Remove the meat to a cutting board and slice it thinly against the grain. Reserve one-third of the sliced brisket and one-third of the cooking liquid for the brisket sandwiches. Transfer the reserved meat and liquid to a Ziploc® Brand Container with the Smart Snap™ Seal and refrigerate or freeze for sandwiches.
step 5Transfer the remaining sliced meat to a serving platter. Using a slotted spoon, transfer the vegetables to the serving platter and arrange them around the meat. Spoon the sauce over the brisket and vegetables and sprinkle with chopped scallions.

To Make Sandwiches:

Defrost reserved brisket if you’ve frozen it. Slice open the rolls. Divide the cole slaw among the 4 rolls. Divide the sliced brisket among the rolls, placing it on top of the cole slaw. Drizzle with the reserved brisket sauce. Place the top on each roll and serve.

Tuesday, February 1, 2011

A Weekend of Woodturning

I'll be teaching Woodturning this weekend
 at the

Florida Annual Woodturning Symposium

February 4-6, 2011

I am teaching three classes during rotations, where I'll be showing woodturners from all over the country (about 350 of them!) how to make things like this:  


The Florida Woodturning Symposium (FWS) is an annual event which is held each year at the Lake Yale Baptist Conference Center. It began in December 2001 through the efforts of five Florida Chapters of the American Association of Woodturners. The second symposium was held in January 2003. The symposium is normally held each January but this year it had to be changed due to a scheduling conflict at the Baptist Conference Center. The FWS's mission is to promote the art of woodturning through the annual symposium and other events.  Last year, more than 300 woodturners from all over the country attended this annual event.


This Year's Featured Demonstrators

There will be eight rotations with four presentations each featuring the following individuals:
(Click on name for short Bio)
Malcolm TibbetsFranck Johannesen
Curt TheobaldSteven Marlow
Beth IrelandJames McClure
John JordanJack Shelton
More Info HERE

"Maple Overload" Breakfast Fattie

This was a yummy - albeit fattening - breakfast dish I made a few weeks ago.


You can read all about it here:

"Maple Overload" Breakfast Fattie - SmokingMeatForums.com Community

Coffee Marinated Salmon with Smoked Apple Salad - SmokingMeatForums.com Community

Dinner last Sunday night.  One of my favorite ways to prepare salmon.


Recipes below the photo.  More complete explanation here:

Coffee Marinated Salmon with Smoked Apple Salad - SmokingMeatForums.com Community


Coffee Marinated Pork or Salmon
Makes enough marinade for about 2-1/2 lbs of meat
  • ·         2 tablespoons sesame seeds
  • ·         3 tablespoons butter or margarine
  • ·         1 small onion, chopped
  • ·         2 garlic cloves, minced
  • ·         1 Tbs strong instant coffee or instant espresso powder (I use Bustello Instant)
  • ·         1/2 Cup  soy sauce
  • ·         1/4 cup sherry or dry white wine
  • ·         2 tablespoons apple cider vinegar
  • ·         2 tablespoons Worcestershire sauce
  • ·         4 Tbs Brown sugar

Sautee sesame seeds in butter for a few minutes until slightly toasted then add onion and garlic and cook until clear and slightly softened.
Mix all remaining ingredients together and add to saucepan.  Bring to a boil and allow to simmer for 1-2 minutes.
Remove from heat and allow to cool completely.
Once cool, pour marinade into a large plastic zip-top bag and add meat.
Refrigerate and marinate up to 4 hours for Salmon or Overnight for pork.
Prepare your grill or smoker, remove meat from marinade and discard unused portion.
Grill or Smoke to your liking.
Remove and let rest (30 minutes for pork, 10 minutes for salmon)
Drizzle with coffee glaze (recipe below) if desired.


Coffee Glaze for Smoked Pork/Fish
  • ·         1 Cup water
  • ·         3/4 cup brown sugar
  • ·         1-1/2 tsp Instant Espresso powder (I use Cafe Bustello instant)

In a heavy saucepan bring water to rolling boil.  Reduce to simmer and add brown sugar a tablespoon at a time and stir until completely dissolved.  Add coffee powder and stir to dissolve.
Continue to simmer until reduced by 1/2
Allow to cool at room temperature for several hours.
For best results pour into squeeze bottle once cooled
Drizzle on Coffee-Marinated Pork or Salmon after removing from grill or smoker
Refrigerate unused portion